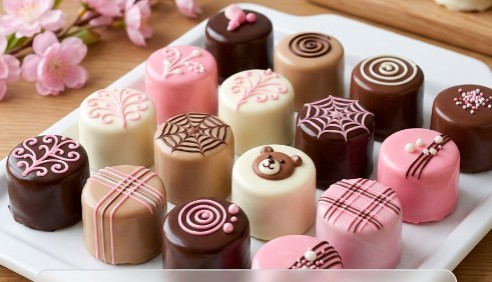
How to Make Bakery-Style Nutella Mini Cakes
Looking for a special dessert for your next party? These Nutella mini cakes are perfect. They look like fancy treats from a professional bakery. The outside is a crisp and smooth chocolate shell. Inside, you will find soft cake layers and a rich Nutella cream filling. You can decorate them with cute spiderweb patterns, pretty lines, or even a little bear face. Let’s make these delicious bite-sized cakes!
⏱️ Quick Facts
-
Prep Time: 45 Minutes
-
Bake Time: 9 Minutes per cake
-
Chill Time: 1 Hour
-
Method: Baking and Layering
🛒 Ingredients
For the Sponge Cake (Make this twice!):
-
125g Soft Butter
-
125g Sugar
-
1 tsp Vanilla Extract and a pinch of Salt
-
30g Nutella (or any chocolate cream)
-
2 Large Eggs
-
100g All-purpose Flour
For the Rich Filling:
-
160g Dark Chocolate
-
120g Nutella
For Coating and Decorating:
-
Meltable chocolates in Dark, White, Milk, and Pink
-
50g Melting Chocolate & 25g Glucose Syrup (for modeling chocolate)
-
Edible pearls, sprinkles, and gold dust
👩🍳 Step-by-Step Instructions
1. Bake the Cake Layers: Mix your soft butter, sugar, vanilla, salt, and 30g of Nutella in a bowl until smooth. Add the eggs one at a time and mix well. Gently fold in the flour. Spread this batter flat in a baking pan. Bake at 170°C for 8 to 9 minutes. You need two layers for this recipe, so make this batter and bake it a second time. Let both cakes cool completely.
2. Make the Cream Filling: Melt the 160g of dark chocolate in the microwave. Stir in the 120g of Nutella until they are completely mixed. This makes a very thick and tasty cream.
3. Build the Mini Cakes: Spread your Nutella cream evenly over the first cold cake layer. Put the second cake layer right on top and press down gently. Put this whole layered cake in the fridge for 1 hour to get firm.
4. Cut and Dip: Take the firm cake out of the fridge. Use a small round cutter to punch out little circle cakes. Save the leftover cake scraps in the freezer to make cake pops later. Dip your cold mini cakes into different colors of melted chocolate. Tap off the extra chocolate so the shell is thin and smooth.
5. Decorate Like a Pro: To make the cool spiderweb pattern, pipe lines of a different colored chocolate while the base coat is still wet. Quickly drag a toothpick through the lines before the chocolate dries.
6. Make Modeling Chocolate: Want to make special 3D decorations? Melt 50g of chocolate and stir in 25g of glucose syrup. Stop stirring as soon as it looks shiny and separates. Let it sit on your table for 30 minutes. Do not put it in the fridge. Knead it until soft and use it to make cute shapes.
💡 Tips for Success
You must work very quickly when doing the wet-on-wet spiderweb design. If the base chocolate dries even a little bit, the toothpick will not drag smoothly. Always make sure your layered cake is totally cold before cutting it. A warm cake will crumble and make your round edges look messy.
🥡 How to Store
Keep your beautiful mini cakes in a closed box in the fridge. They will stay fresh and tasty for up to 5 days. Let them sit on the counter for a few minutes before eating. This makes the cake soft again while keeping the chocolate shell perfectly crisp.